Drone simulation
V-REP
Installation
The installation of V-REP is straightforward. From the v-rep official site, download the archive corresponding to your system. Extract the directory from it. So you have somewhere in your disk a somewhere/V-REP_PRO_EDU_..../ directory. Let us define an environement variable corresponding to the path of this directory.
Edit your ~/.bashrc, and add the following lines at the end (use the actual path of your v-rep directory instead of somewhere/V-REP_PRO_EDU_..../ of course).
Edit your ~/.bashrc, and add the following lines at the end (use the actual path of your v-rep directory instead of somewhere/V-REP_PRO_EDU_..../ of course).
# V-REP location
export VREP_ROOT=somewhere/V-REP_PRO_EDU_....
Then, close all terminals and re-open a new one, so that the $VREP_ROOT variable is actually defined. To launch v-ep, you just have to
cd $VREP_ROOT
./vrep.sh
Now, we are ready to start real job...
Our first drone scene
Let us build our drone simulator from an existing drone in v-rep, in order to discover some v-rep features.
- Start v-rep
- Resize the floor (10m x 10m). The floor object as a popup dialog for this.
- Take a quadricopter from the mobile robot models, and drag it in the scene.
- Use the translation editor and place the drone at (0,0,.8).
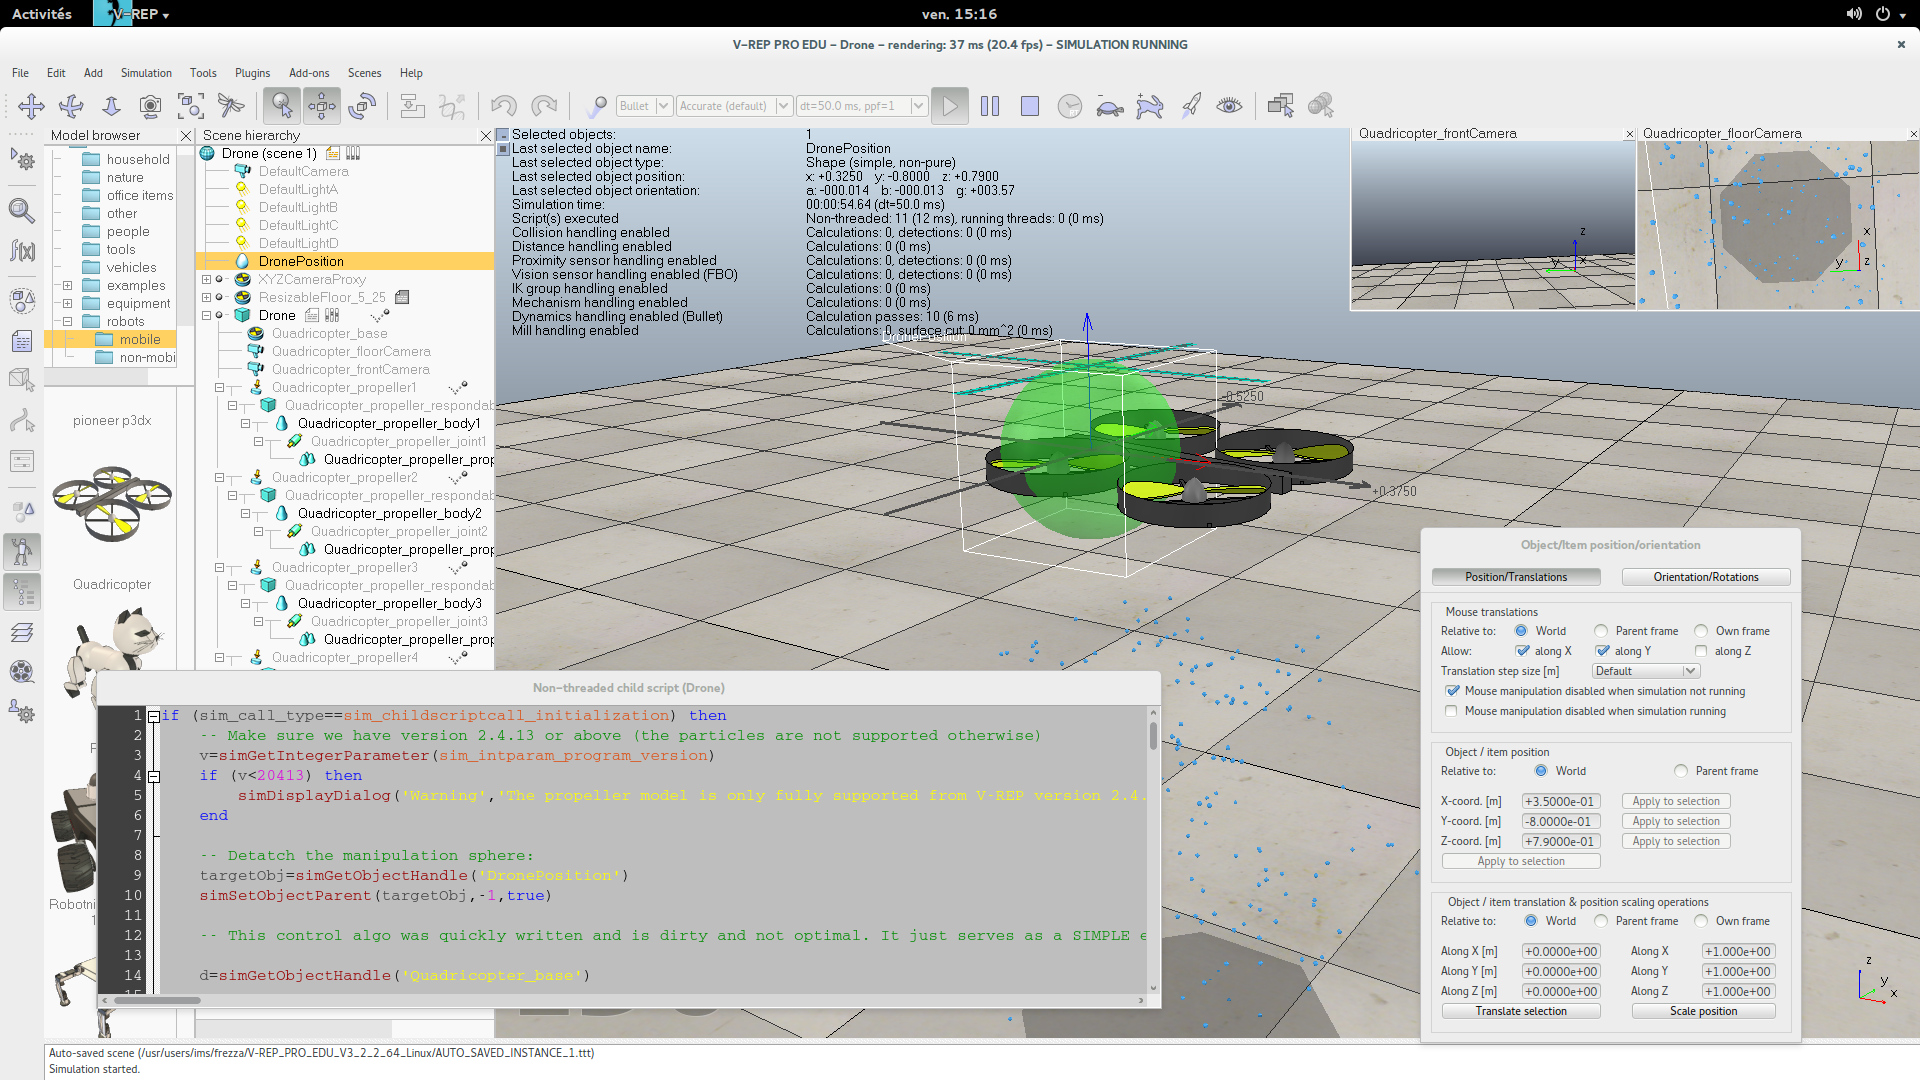
- Start simulation. Select the green target, move it and rotate it during the simulation.
- Rename the quadricopter as "Drone".
- Rename the inner green sphere (the drone target position) as "DronePosition".
- Start simulation
- Start simulation
- Stop it and save the scene as "Drone.ttt"
Let us have a deeper look at the lua script. Try to understand what is done (except the calculation of the propeller velocities which will be changed next). Why is the sphere detached ? How is the propeller speed pass to the propeller controllers ?
Game-like tracking camera
Let us add a tracking camera.
- Remove the two cameras of the quadricopter from the object tree interface.
- Add a camera named "TrackCam" behind the drone, slightly above it, looking at it. It should stay behind when the drone moves (define it as a child of "Quadricopter_base", and place it according to its parent frame).
- In the lua script, remove the two floatting views... For one of those two, you can reuse the code with slight modifications so that the view now displays "TrackCam". Modifications have to be done in both initialization and cleanup parts of the lua script.
- Save and start simulation
Our track cam is attached to the drone frame. Indeed, another frame would be better.
- Add a dummy object named "Track_base" as a child of the drone.
- Make the track cam be a child of this frame, rather than a child of "Quadricopter_base".
- Translate Track_base to (0,0,0) according to its parent frame.
- Save and start simulation
trackBase=simGetObjectHandle('Track_base')
simSetObjectParent(trackBase,-1,true)
We have unparented trackBase so that we can further set its position independently from the motion computation performed for Quadricopter_base. The object trackBase is thus now freed from any physics computation and can be moved in the world without being influenced by the simulation.- Add a sensing part in the script, similarly to the init, cleanup and actuation parts:
if (sim_call_type==sim_childscriptcall_sensing) then
  -- code here
end
d=simGetObjectHandle('Quadricopter_base')
Now, in the sensing part of the script, let us get the position of the drone... :
pos=simGetObjectPosition(d,-1)So we only have to adjust (in the sensing part of the script) the absolute position of the "Track_base" frame from the absolute position of the "Quadricopter_base" frame:
ori = simGetObjectOrientation(d,-1)
simSetObjectPosition(trackBase,-1,pos)
simSetObjectOrientation(trackBase,-1,{0,0,ori[3]})
The "Track_base" frame is nice for a game-like display, but it will also be useful for incoming control of the drone.
- Save and start simulation
Enter V-REP ?
Understanding how V-REP works might help you to build up your own robots, interfacing them with ROS. It is really worth it. This is what the rest of this page adresses. Nevertheless, you can skip this if you want directly to play with a already-made drone. If you do not want to skip, go to next section. Otherwise, execute the following instructions and you are done.
- Configure V-REP for ROS compatibility, see here.
- Get the file drone.ttm and put it in the models subdirectory of your v-rep directory.
- launch roscore in another terminal
- launch ./vrep.sh in another terminal. Warning !, the ros stuff have to be accessible in that terminal (i.e the file my_ros_ws/devel/setup.bash must have been sourced). Set up a scene with the drone model you have just added. Start the simulation.
- In another terminal, type
rosrun rqt_image_view rqt_image_view
and select the /drone/front image topic. - In another terminal, we will use the demo-teleop package (we have added it in the workspace when whe have configured the environement, see the git command here).
rosrun demo_teleop key_teleop.py cmd_vel:=/drone/cmd_vel
Simulation
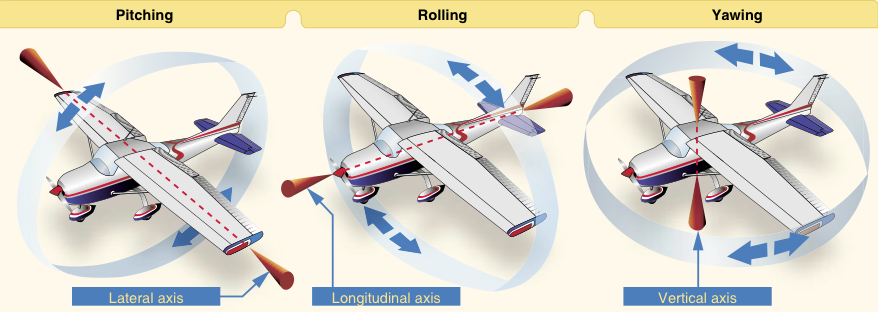
Vocabulary
Removing existing control code
The idea here is to build up our own controller. To do so, we need first to clear the existing target-based control.
- Remove the target object (the green sphere) and its references in the lua script.
- In the init part, remove the control parameters, and use the following ones instead. Warning ! Do not remove the code that sets the propeller scripts.
-- Variables for control
thrust_gravity = 5.33 -- compensation for gravity
thrust         = thrust_gravity
pitch_corr     = 0
yaw_corr       = 0
roll_corr      = 0
dt             = .05

prop_front_left  = 1
prop_back_left   = 2
prop_back_right  = 3
prop_front_right = 4
particlesTargetVelocities = {0,0,0,0}

twist = {0,0,0,0,0,0} -- current twist command {vx,vy,vz,-,-,rz}.
We will extend this init section later. - In the actuation part, remove the control of propeller velocities, and replace it by the following.
-- propellers velocities computation

particlesTargetVelocities[prop_front_left] = thrust*(1 - pitch_corr - roll_corr - yaw_corr)
particlesTargetVelocities[prop_back_left]  = thrust*(1 + pitch_corr - roll_corr + yaw_corr)
particlesTargetVelocities[prop_back_right] = thrust*(1 + pitch_corr + roll_corr - yaw_corr)
particlesTargetVelocities[prop_front_right]= thrust*(1 - pitch_corr + roll_corr + yaw_corr)
- In the sensing part, add the computation of pitch, yaw, roll corrections and thrust
-- compute local velocities

-- update twist

twist[1] = 0 -- front speed
twist[2] = 0 -- lateral speed
twist[3] = 0 -- absolute elevation request (if not null)
twist[6] = 0 -- yaw speed.

-- Elevation control

thrust = thrust_gravity

-- yaw control

yaw_corr = 0

-- pitch and vx control

pitch_corr = 0

-- roll and vy control

roll_corr = 0
We will fill the missing code later. - Save and start simulation
Elevation control
Let us control the height of the drone. This consists of adjusting the overall thrust so that the height of the drone is at a desired position.
- In the init part of the script, in the parameter settings section, add
pos = simGetObjectPosition(d,-1) -- get drone absolute position
Dthrust = 1
zref    = pos[3] -- used if z-speed command is null.
Kzref   = 5
Dzref   = 3
- Then, in the sensing part, where local velocities have to be computed, add
local_ori         = simGetObjectOrientation(d,trackBase)    -- orientation in the track frame
d_global_pos, d_global_ori = simGetObjectVelocity(d)        -- global linear and angular speeds.
track_mat         = simGetObjectMatrix(trackBase,-1)        -- ask me about matrices...
track_mat_inv     = simGetInvertedMatrix(track_mat)
track_mat_inv[ 4] = 0
track_mat_inv[ 8] = 0
track_mat_inv[12] = 0
d_local_pos = simMultiplyVector(track_mat_inv,d_global_pos) -- linear speed in the track frame
- In the elevation control part, replace the thrust update by the following. It consist on controlling the vertical speed if the twist linear z command (twist[3]) is not null (and record the elevation in the zref variable). If the vertical speed command is null, the control maintains the drone at zref elevation.
if(twist[3] == 0) then -- we have to maintain current elevation at zref value thrust = thrust_gravity + Kzref*(zref - pos[3]) - Dzref*d_global_pos[3] else thrust = thrust_gravity + Dthrust*(twist[3]-d_global_pos[3]) zref = pos[3] -- will be used in case of null z-speed command. end - Save and start simulation
Yaw control
The yaw control can be done quite easily.
- In the init part of the script, in the parameter settings section, add
Dyaw = 1
- In the sensing part, where yaw correction is computed, write
dyaw        = d_global_ori[3]
dyaw_target = twist[6]
yaw_corr    = Dyaw*(dyaw_target-dyaw)
- Save and start simulation
Pitch control
The pitch control is a bit more complex, since maintaining the pitch to some constant inclination value leads to a drone acceleration. This is what I propose.
- In the init part of the script, in the parameter settings section, add
angle_min = .2
angle_max = .5
Pangle    = .3
Dangle    = .2
Kvcorr    = .5

pitch_prev = 0
- Then, in the sensing part, where pitch correction is computed, write
vx_corr = twist[1] - d_local_pos[1] pitch = local_ori[2] dpitch = (pitch - pitch_prev)/dt pitch_prev = pitch pitch_target = Kvcorr*vx_corr; if twist[1] >= 0 then if pitch_target > angle_max then pitch_target = angle_max elseif pitch_target < -angle_min then pitch_target = -angle_min end elseif twist[1] < 0 then if pitch_target < -angle_max then pitch_target = -angle_max elseif pitch_target > angle_min then pitch_target = angle_min end end pitch_corr = Pangle*(pitch_target-pitch) - Dangle*dpitch - Save and start simulation
Roll control
The roll control is identical to the pitch one.
- In the init part of the script, in the parameter settings section, add
roll_prev = 0
- Then, in the sensing part, where roll correction is computed, write
vy_corr = twist[2] - d_local_pos[2] roll = -local_ori[1] droll = (roll - roll_prev)/dt roll_prev = roll roll_target = Kvcorr*vy_corr; if twist[2] >= 0 then if roll_target > angle_max then roll_target = angle_max elseif roll_target < -angle_min then roll_target = -angle_min end elseif twist[2] < 0 then if roll_target < -angle_max then roll_target = -angle_max elseif roll_target > angle_min then roll_target = angle_min end end roll_corr = Pangle*(roll_target-roll) - Dangle*droll - Save and start simulation
Stability tests
Now, you can change the drone height and orientation during the simulation run. It should return to a still position.
ROS interface
In order to be able to interact with ROS, you have to install some ROS packages in your workspace and add libraries to V-REP to handle interaction with ros. Follow the instructions here.
We need to have roscore running before v-rep is started. So close your current v-rep, run roscore, and restart v-rep.
The twist topic
- In the init part of the script, after the parameter settings section, add
-- ROS stuff twist_subscriber = simExtRosInterface_subscribe('/drone/cmd_vel', 'geometry_msgs/Twist', 'on_twist',1) - The previous statement says that some callback function on_twist will be called when a twist message is got through the topic /drone/cmd_vel.
- In the cleaning part, let us clean this subscriber. Add
simExtRosInterface_shutdownSubscriber(twist_subscriber)
- At the end of the script, let us write the callback:
function on_twist(msg) twist[1] = msg.linear.x twist[2] = msg.linear.y twist[3] = msg.linear.z twist[4] = msg.angular.x twist[5] = msg.angular.y twist[6] = msg.angular.z end - Save and start simulation
Now, let us setup the ros communication. Indeed, the twist topic /drone/cmd_vel is available. Let us use it to set the elevation of the drone at 1 meter high.
rostopic pub /drone/cmd_vel geometry_msgs/Twist "linear:
  x: 0.0
  y: 0.0
  z: 1.0
angular:
  x: 0.0
  y: 0.0
  z: 0.0"
Now, let us use the keyboard to control the drone navigation. I propose a teleop package for that purpose. Read the code in order to learn how to interact with the keyboard in ROS.
cd your_catkin_workspace/src
git clone https://github.com/HerveFrezza-Buet/demo-teleop.git
cd ..
catkin build
Now, run that teleop node and control the drone with the keyboard.
rosrun demo_teleop key_teleop.py cmd_vel:=/drone/cmd_velDo not forget to save your scene.
The image topic
Our drone really needs a camera (i.e a vision sensor, not a new openGL view of the scene). Let us add it, and then bind it to a ROS image topic.
In the frame of the drone (i.e "Quadricopter base"), add a perspective vision sensor named "FrontVision". Be sure to orient it carefully. Place it just in front of the central stick (i.e. the body) of the drone (set its position and orientation relativly to the parent frame : the blue axis points toward front, the green one point at the top and the red one point to the left). Set its dimensions to 640x480. Configure a far clipping plane (100m).
Then, in the init part of the lua script, in the section for ros stuff, add:
frontImage = simGetObjectHandle('FrontVision')
image_publisher = simExtRosInterface_imageTransportAdvertise('/drone/front', 1)
Then in the cleanup section, add
simExtRosInterface_shutdownPublisher(image_publisher)Last, let us get image data and send it on the image topic. Add this in the sensing part of the script, at the end.
-- ROS stuff : publish the image
local data,w,h = simGetVisionSensorCharImage(frontImage)
simExtRosInterface_imageTransportPublish(image_publisher, data, w, h, "drone front")
Do not forget to save your scene.
Then, the ros image topic /drone/front is available.
rosrun image_view image_view image:=/drone/front
Conclusion
From the vrep interface, select your Drone, and save it as a model (.ttm) file. Put the model into the "models" subdirectory of your v-rep directory. It is now available as any other robot for the building up of an drone experimentation platform.